Search In This Blog

Showing posts with label Programing. Show all posts

Tuesday, November 10, 2009

INF: Shrinking the Transaction Log in SQL Server 2000 with DBCC SHRINKFILE

Shrinking the log in SQL Server 2000 is no longer a deferred operation. A shrink operation attempts to shrink the file immediately. However, in some circumstances it may be necessary to perform additional actions before the log file is shrunk to the desired size.

MORE INFORMATION


When DBCC SHRINKFILE is run, SQL Server 2000 shrinks the log file by removing a...


When DBCC SHRINKFILE is run, SQL Server 2000 shrinks the log file by removing as many virtual log files as it can to attempt to reach the target size. If the target file size is not reached, SQL Server places dummy log entries in the last virtual log file until the virtual log is filled and moves the head of the log to the beginning of the file. The following actions are then required to complete the shrinking of the transaction log:
  1. You must run a BACKUP LOG statement to free up space by removing the inactive portion of the log.
  2. You must run DBCC SHRINKFILE again with the desired target size until the log file shrinks to the target size.
The following example demonstrates this with the pubs database and attempts to shrink the pubs_log file to 2 MB:
  1. Run this code:


    DBCC SHRINKFILE(pubs_log, 2)
          
    NOTE: If the target size is not reached, proceed to the next step.


  2. Run this code if you want to truncate the transaction log and not keep a backup of the transaction log. Truncate_only invalidates your transaction log backup sequence. Take a full backup of your database after you perform backup log with truncate_only:


    BACKUP LOG pubs WITH TRUNCATE_ONLY
    -or-
    Run this code if you want to keep a backup of your transaction log and keep your transaction log backup sequence intact. See SQL Server Books Online topic "BACKUP" for more information:


    BACKUP LOG pubs TO pubslogbackup


  3. Run this code:


    DBCC SHRINKFILE(pubs_log,2)
         
    The transaction log has now been shrunk to the target size.


REFERENCES

For more information, see the Shrinking the Transaction Log and DBCC SHRINKFILE topics in SQL Server 2000 Books Online.

For additional information about shrinking the transaction log in SQL Server 7.0, click the article number below to view the article in the Microsoft Knowledge Base:
256650  (http://support.microsoft.com/kb/256650/EN-US/ ) INF: How to Shrink the SQL Server Transaction Log

Monday, November 09, 2009

INFO: Required Network Rights for the SourceSafe Directories


Improperly setting network rights for the SourceSafe directories may cause errors with the system.
The following tables list the SourceSafe directories and the rights that need to be set for network access. Full access includes read, write, and destroy privileges.

For SourceSafe 3.x


SourceSafe for         Rights Required
   Windows NT             for
   Directory              Network Access
   ---------------        ----------------

   \SS\WINNT              Read

   SourceSafe for         Rights Required
   MS-DOS or Windows      for
   Directory              Network Access
   -----------------      --------------------------------------------

   \SS                    Read
   \SS\DATA               Full access or read-only for read-only users
   \SS\ADMIN              None - But SourceSafe admins should have
                          full access

   \SS\TEMP               Full access
   \SS\USERS\   Full access
   \SS\WINNT              None
   \SS\MACROS             Read
 

SourceSafe 4.0 Server Installation

SourceSafe for         Rights Required
   32-bit Windows         for
   Directory              Network Access
   -----------------      --------------------------------------

   \VSS\WIN32             None-But SourceSafe admins should have
                          full access

   SourceSafe for         Rights Required
   16-bit Windows         for
   Directory              Network Access
   -----------------      --------------------------------------

   \VSS\WIN               None-But SourceSafe admins should have
                          full access

   \VSS\DOS               None-But SourceSafe admins should have
                          full access

   SourceSafe for         Rights Required
   MS-DOS or Windows      for
   Directory              Network Access
   ------------------     --------------------------------------------

   \VSS                   Read
   \VSS\DATA              Full access or read-only for read-only users
   \VSS\TEMP              Full access
   \VSS\USERS\  Full access
   \VSS\NETSETUP.X86      Read
   \VSS\MACROS            Read

SourceSafe 5.0 Server Installation

SourceSafe for         Rights Required
   32-bit Windows         for
   Directory              Network Access
   -----------------      --------------------------------------

   \VSS\WIN32             None-But SourceSafe admins should have
                          full access

   SourceSafe for         Rights Required
   MS-DOS or Windows      for
   Directory              Network Access
   -----------------      --------------------------------------------

   \VSS                   Read
   \VSS\DATA              Full access or read-only for read-only users
   \VSS\DATA\LOGGEDIN     Full access
   \VSS\TEMP              Full access
   \VSS\USERS\  Full access
   \VSS\NETSETUP          Read

SourceSafe 6.0 Server Installation

SourceSafe for         Rights Required
   32-bit Windows         for
   Directory              Network Access
   -----------------      --------------------------------------

   \VSS\WIN32             None-But SourceSafe admins should have
                          full access

   SourceSafe for         Rights Required
   MS-DOS or Windows      for
   Directory              Network Access
   -----------------      --------------------------------------------

   \VSS                   Read
   \VSS\DATA              Full access or read-only for read-only users
   \VSS\DATA\LOGGEDIN     Full access
   \VSS\DATA\LABELS       Full access
   \VSS\TEMP              Full access
   \VSS\USERS\  Full access
   \VSS\NETSETUP          Read
NOTE: The immediately preceding set of permissions does not allow the user to run NetSetup. If you want to allow a given user to run NetSetup (for SourceSafe installation), make sure that you grant Execute permissions to that user in the \VSS directory.
Although not recommended for performance reasons, if your SourceSafe Clients intend to run the SourceSafe executables directly from the Network (that is, they are not going to create a client installation on their local drives), then modify the table above with the following changes:
SourceSafe for         Rights Required
   32-bit Windows         for
   Directory              Network Access

   ---------------        --------------------------------------

   \VSS\WIN32             Read-But SourceSafe admins should have
                          full access

   SourceSafe for         Rights Required
   16-bit Windows         for
   Directory              Network Access
   ----------------       --------------------------------------

   \VSS\WIN               Read-But SourceSafe admins should have
                          full access

   \VSS\DOS               Read-But SourceSafe admins should have
                          full access
NOTE: In this scenario, all users will have access to the maintenance utilities (ANALYZE, DDCONV etc.) located in these directories. These may be moved to an alternate location if desired.

Sunday, November 08, 2009

Optimistic Concurrency


In a multiuser environment, there are two models for updating data in a database: optimistic concurrency, and pessimistic concurrency. The DataSet object is designed to encourage the use of optimistic concurrency for long-running activities such as when you are remoting data and when users are interacting with data.
Pessimistic concurrency involves locking rows at the data source to prevent users from modifying data in a way that affects other users. In a pessimistic model, when a user performs an action that causes a lock to be applied, other users cannot perform actions that would conflict with the lock until the lock owner releases it. This model is primarily used in environments where there is heavy contention for data, where the cost of protecting data with locks is less than the cost of rolling back transactions if concurrency conflicts occur.
Therefore, in a pessimistic currency model, a user who reads a row with the intention of changing it establishes a lock. Until the user has finished the update and released the lock, no one else can change that row. For this reason, pessimistic concurrency is best implemented when lock times will be short, as in programmatic processing of records. Pessimistic concurrency is not a scalable option when users are interacting with data, causing records to be locked for relatively large periods of time.
By contrast, users who use optimistic concurrency do not lock a row when reading it. When a user wants to update a row, the application must determine whether another user has changed the row since it was read. Optimistic concurrency is generally used in environments with a low contention for data. This improves performance as no locking of records is required, and locking of records requires additional server resources. Also, in order to maintain record locks, a persistent connection to the database server is required. Because this is not the case in an optimistic concurrency model, connections to the server are free to serve a larger number of clients in less time.
In an optimistic concurrency model, a violation is considered to have occurred if, after a user receives a value from the database, another user modifies the value before the first user has attempted to modify it.
The following tables follow an example of optimistic concurrency.
At 1:00 p.m., User1 reads a row from the database with the following values:

CustID     LastName     FirstName
101          Smith             Bob
Column name Original value Current value Value in database
CustID 101 101 101
LastName Smith Smith Smith
FirstName Bob Bob Bob

At 1:01 p.m., User2 reads the same row.
At 1:03 p.m., User2 changes FirstName from "Bob" to "Robert" and updates the database.

Column name Original value Current value Value in database
CustID 101 101 101
LastName Smith Smith Smith
FirstName Bob Robert Bob

The update succeeds because the values in the database at the time of update match the original values that User2 has.
At 1:05 p.m., User1 changes Bob's first name to "James" and tries to update the row.

Column name Original value Current value Value in database
CustID 101 101 101
LastName Smith Smith Smith
FirstName Bob James Robert

At this point, User1 encounters an optimistic concurrency violation because the values in the database no longer match the original values that User1 was expecting. The decision now needs to be made whether to overwrite the changes supplied by User2 with the changes supplied by User1, or to cancel the changes by User1.

Testing for Optimistic Concurrency Violations

There are several techniques for testing for an optimistic concurrency violation. One involves including a timestamp column in the table. Databases commonly provide timestamp functionality that can be used to identify the date and time when the record was last updated. Using this technique, a timestamp column is included in the table definition. Whenever the record is updated, the timestamp is updated to reflect the current date and time. In a test for optimistic concurrency violations, the timestamp column is returned with any query of the contents of the table. When an update is attempted, the timestamp value in the database is compared to the original timestamp value contained in the modified row. If they match, the update is performed and the timestamp column is updated with the current time to reflect the update. If they do not match, an optimistic concurrency violation has occurred.
Another technique for testing for an optimistic concurrency violation is to verify that all the original column values in a row still match those found in the database. For example, consider the following query:
SELECT Col1, Col2, Col3 FROM Table1

To test for an optimistic concurrency violation when updating a row in Table1, you would issue the following UPDATE statement:
UPDATE Table1 Set Col1 = @NewCol1Value,
              Set Col2 = @NewCol2Value,
              Set Col3 = @NewCol3Value
WHERE Col1 = @OldCol1Value AND
      Col2 = @OldCol2Value AND
      Col3 = @OldCol3Value

As long as the original values match the values in the database, the update is performed. If a value has been modified, the update will not modify the row because the WHERE clause will not find a match.
Note that it is recommended to always return a unique primary key value in your query. Otherwise, the preceding UPDATE statement may update more than one row, which might not be your intent.
If a column at your data source allows nulls, you may need to extend your WHERE clause to check for a matching null reference in your local table and at the data source. For example, the following UPDATE statement verifies that a null reference in the local row still matches a null reference at the data source, or that the value in the local row still matches the value at the data source.
UPDATE Table1 Set Col1 = @NewVal1
  WHERE (@OldVal1 IS NULL AND Col1 IS NULL) OR Col1 = @OldVal1

You may also choose to apply less restrictive criteria when using an optimistic concurrency model. For example, using only the primary key columns in the WHERE clause results in the data being overwritten regardless of whether the other columns have been updated since the last query. You can also apply a WHERE clause only to specific columns, resulting in data being overwritten unless particular fields have been updated since they were last queried.

The DataAdapter.RowUpdated Event

The DataAdapter.RowUpdated event can be used in conjunction with the techniques described earlier, to provide notification to your application of optimistic concurrency violations. RowUpdated occurs after each attempt to update a Modified row from a DataSet. This enables you to add special handling code, including processing when an exception occurs, adding custom error information, adding retry logic, and so on. The RowUpdatedEventArgs object returns a RecordsAffected property with the number of rows affected by a particular update command for a modified row in a table. By setting the update command to test for optimistic concurrency, the RecordsAffected property will, as a result, return a value of 0 when an optimistic concurrency violation has occurred, because no records were updated. If this is the case, an exception is thrown. The RowUpdated event enables you to handle this occurrence and avoid the exception by setting an appropriate RowUpdatedEventArgs.Status value, such as UpdateStatus.SkipCurrentRow. For more information about the RowUpdated event, see Working with DataAdapter EventsWorking with DataAdapter Events.
Optionally, you can set DataAdapter.ContinueUpdateOnError to true, before calling Update, and respond to the error information stored in the RowError property of a particular row when the Update is completed. For more information, see Adding and Reading Row Error Information.

Optimistic Concurrency Example

The following is a simple example that sets the UpdateCommand of a DataAdapter to test for optimistic concurrency, and then uses the RowUpdated event to test for optimistic concurrency violations. When an optimistic concurrency violation is encountered, the application sets the RowError of the row that the update was issued for to reflect an optimistic concurrency violation.
Note that the parameter values passed to the WHERE clause of the UPDATE command are mapped to the Original values of their respective columns.
[Visual Basic]
Dim nwindConn As SqlConnection = New SqlConnection("Data Source=localhost;Integrated Security=SSPI;Initial Catalog=northwind")

  Dim custDA As SqlDataAdapter = New SqlDataAdapter("SELECT CustomerID, CompanyName FROM Customers ORDER BY CustomerID", nwindConn)

  ' The Update command checks for optimistic concurrency violations in the WHERE clause.
  custDA.UpdateCommand = New SqlCommand("UPDATE Customers (CustomerID, CompanyName) VALUES(@CustomerID, @CompanyName) " & _
                                        "WHERE CustomerID = @oldCustomerID AND CompanyName = @oldCompanyName", nwindConn)
  custDA.UpdateCommand.Parameters.Add("@CustomerID", SqlDbType.NChar, 5, "CustomerID")
  custDA.UpdateCommand.Parameters.Add("@CompanyName", SqlDbType.NVarChar, 30, "CompanyName")

  ' Pass the original values to the WHERE clause parameters.
  Dim myParm As SqlParameter
  myParm = custDA.UpdateCommand.Parameters.Add("@oldCustomerID", SqlDbType.NChar, 5, "CustomerID")
  myParm.SourceVersion = DataRowVersion.Original
  myParm = custDA.UpdateCommand.Parameters.Add("@oldCompanyName", SqlDbType.NVarChar, 30, "CompanyName")
  myParm.SourceVersion = DataRowVersion.Original

  ' Add the RowUpdated event handler.
  AddHandler custDA.RowUpdated, New SqlRowUpdatedEventHandler(AddressOf OnRowUpdated)

  Dim custDS As DataSet = New DataSet()
  custDA.Fill(custDS, "Customers")

  ' Modify the DataSet contents.

  custDA.Update(custDS, "Customers")

  Dim myRow As DataRow

  For Each myRow In custDS.Tables("Customers").Rows
    If myRow.HasErrors Then Console.WriteLine(myRow(0) & vbCrLf & myRow.RowError)
  Next


Private Shared Sub OnRowUpdated(sender As object, args As SqlRowUpdatedEventArgs)
  If args.RecordsAffected = 0
    args.Row.RowError = "Optimistic Concurrency Violation Encountered"
    args.Status = UpdateStatus.SkipCurrentRow
  End If
End Sub
[C#]
  SqlConnection nwindConn = new SqlConnection("Data Source=localhost;Integrated Security=SSPI;Initial Catalog=northwind");

  SqlDataAdapter custDA = new SqlDataAdapter("SELECT CustomerID, CompanyName FROM Customers ORDER BY CustomerID", nwindConn);

  // The Update command checks for optimistic concurrency violations in the WHERE clause.
  custDA.UpdateCommand = new SqlCommand("UPDATE Customers (CustomerID, CompanyName) VALUES(@CustomerID, @CompanyName) " +
                                        "WHERE CustomerID = @oldCustomerID AND CompanyName = @oldCompanyName", nwindConn);
  custDA.UpdateCommand.Parameters.Add("@CustomerID", SqlDbType.NChar, 5, "CustomerID");
  custDA.UpdateCommand.Parameters.Add("@CompanyName", SqlDbType.NVarChar, 30, "CompanyName");

  // Pass the original values to the WHERE clause parameters.
  SqlParameter myParm;
  myParm = custDA.UpdateCommand.Parameters.Add("@oldCustomerID", SqlDbType.NChar, 5, "CustomerID");
  myParm.SourceVersion = DataRowVersion.Original;
  myParm = custDA.UpdateCommand.Parameters.Add("@oldCompanyName", SqlDbType.NVarChar, 30, "CompanyName");
  myParm.SourceVersion = DataRowVersion.Original;

  // Add the RowUpdated event handler.
  custDA.RowUpdated += new SqlRowUpdatedEventHandler(OnRowUpdated);

  DataSet custDS = new DataSet();
  custDA.Fill(custDS, "Customers");

  // Modify the DataSet contents.

  custDA.Update(custDS, "Customers");

  foreach (DataRow myRow in custDS.Tables["Customers"].Rows)
  {
    if (myRow.HasErrors)
      Console.WriteLine(myRow[0] + "\n" + myRow.RowError);
  }


protected static void OnRowUpdated(object sender, SqlRowUpdatedEventArgs args)
{
  if (args.RecordsAffected == 0) 
  {
    args.Row.RowError = "Optimistic Concurrency Violation Encountered";
    args.Status = UpdateStatus.SkipCurrentRow;
  }
}

Saturday, November 07, 2009

How to configure SQL Server 2005 to allow remote connections


When you try to connect to an instance of Microsoft SQL Server 2005 from a remote computer, you may receive an error message. This problem may occur when you use any program to connect to SQL Server. For example, you receive the following error message when you use the SQLCMD utility to connect to SQL Server:
Sqlcmd: Error: Microsoft SQL Native Client: An error has occurred while establishing a connection to the server. When connecting to SQL Server 2005, this failure may be caused by the fact that under the default settings SQL Server does not allow remote connections.
This problem may occur when SQL Server 2005 is not configured to accept remote connections. By default, SQL Server 2005 Express Edition and SQL Server 2005 Developer Edition do not allow remote connections. To configure SQL Server 2005 to allow remote connections, complete all the following steps:
  • Enable remote connections on the instance of SQL Server that you want to connect to from a remote computer.
  • Turn on the SQL Server Browser service.
  • Configure the firewall to allow network traffic that is related to SQL Server and to the SQL Server Browser service.
This article describes how to complete each of these steps. 

To enable remote connections on the instance of SQL Server 2005 and to turn on the SQL Server Browser service, use the SQL Server 2005 Surface Area Configuration tool. The Surface Area Configuration tool is installed when you install SQL Server 2005.

Enable remote connections for SQL Server 2005 Express or SQL Server 2005 Developer Edition

You must enable remote connections for each instance of SQL Server 2005 that you want to connect to from a remote computer. To do this, follow these steps:
  1. Click Start, point to Programs, point to Microsoft SQL Server 2005, point to Configuration Tools, and then click SQL Server Surface Area Configuration.
  2. On the SQL Server 2005 Surface Area Configuration page, click Surface Area Configuration for Services and Connections.
  3. On the Surface Area Configuration for Services and Connections page, expand Database Engine, click Remote Connections, click Local and remote connections, click the appropriate protocol to enable for your environment, and then click Apply.

    Note Click OK when you receive the following message:
    Changes to Connection Settings will not take effect until you restart the Database Engine service.
  4. On the Surface Area Configuration for Services and Connections page, expand Database Engine, click Service, click Stop, wait until the MSSQLSERVER service stops, and then click Start to restart the MSSQLSERVER service.

Enable the SQL Server Browser service

If you are running SQL Server 2005 by using an instance name and you are not using a specific TCP/IP port number in your connection string, you must enable the SQL Server Browser service to allow for remote connections. For example, SQL Server 2005 Express is installed with a default instance name of Computer Name\SQLEXPRESS. You are only required to enable the SQL Server Browser service one time, regardless of how many instances of SQL Server 2005 you are running. To enable the SQL Server Browser service, follow these steps.

Important These steps may increase your security risk. These steps may also make your computer or your network more vulnerable to attack by malicious users or by malicious software such as viruses. We recommend the process that this article describes to enable programs to operate as they are designed to, or to implement specific program capabilities. Before you make these changes, we recommend that you evaluate the risks that are associated with implementing this process in your particular environment. If you choose to implement this process, take any appropriate additional steps to help protect your system. We recommend that you use this process only if you really require this process.

  1. Click Start, point to Programs, point to Microsoft SQL Server 2005, point to Configuration Tools, and then click SQL Server Surface Area Configuration.
  2. On the SQL Server 2005 Surface Area Configuration page, click Surface Area Configuration for Services and Connections.
  3. On the Surface Area Configuration for Services and Connections page, click SQL Server Browser, click Automatic for Startup type, and then click Apply.

    Note When you click the Automatic option, the SQL Server Browser service starts automatically every time that you start Microsoft Windows.
  4. Click Start, and then click OK.
Note When you run the SQL Server Browser service on a computer, the computer displays the instance names and the connection information for each instance of SQL Server that is running on the computer. This risk can be reduced by not enabling the SQL Server Browser service and by connecting to the instance of SQL Server directly through an assigned TCP port. Connecting directly to an instance of SQL Server through a TCP port is beyond the scope of this article. For more information about the SQL Server Browser server and connecting to an instance of SQL Server, see the following topics in SQL Server Books Online:
  • SQL Server Browser Service
  • Connecting to the SQL Server Database Engine
  • Client Network Configuration

Create exceptions in Windows Firewall

These steps apply to the version of Windows Firewall that is included in Windows XP Service Pack 2 (SP2) and in Windows Server 2003. If you are using a different firewall system, see your firewall documentation for more information.

If you are running a firewall on the computer that is running SQL Server 2005, external connections to SQL Server 2005 will be blocked unless SQL Server 2005 and the SQL Server Browser service can communicate through the firewall. You must create an exception for each instance of SQL Server 2005 that you want to accept remote connections and an exception for the SQL Server Browser service.

SQL Server 2005 uses an instance ID as part of the path when you install its program files. To create an exception for each instance of SQL Server, you must identify the correct instance ID. To obtain an instance ID, follow these steps:

  1. Click Start, point to Programs, point to Microsoft SQL Server 2005, point to Configuration Tools, and then click SQL Server Configuration Manager.
  2. In SQL Server Configuration Manager, click the SQL Server Browser service in the right pane, right-click the instance name in the main window, and then click Properties.
  3. On the SQL Server Browser Properties page, click the Advanced tab, locate the instance ID in the property list, and then click OK.
To open Windows Firewall, click Start, click Run, type firewall.cpl, and then click OK.

Create an exception for SQL Server 2005 in Windows Firewall

To create an exception for SQL Server 2005 in Windows Firewall, follow these steps:
  1. In Windows Firewall, click the Exceptions tab, and then click Add Program.
  2. In the Add a Program window, click Browse.
  3. Click the C:\Program Files\Microsoft SQL Server\MSSQL.1\MSSQL\Binn\sqlservr.exe executable program, click Open, and then click OK.

    Note The path may be different depending on where SQL Server 2005 is installed. MSSQL.1 is a placeholder for the instance ID that you obtained in step 3 of the previous procedure.
  4. Repeat steps 1 through 3 for each instance of SQL Server 2005 that needs an exception.

Create an exception for the SQL Server Browser service in Windows Firewall

To create an exception for the SQL Server Browser service in Windows Firewall, follow these steps:
  1. In Windows Firewall, click the Exceptions tab, and then click Add Program.
  2. In the Add a Program window, click Browse.
  3. Click the C:\Program Files\Microsoft SQL Server\90\Shared\sqlbrowser.exe executable program, click Open, and then click OK.

    Note The path may be different depending on where SQL Server 2005 is installed.

Thursday, October 29, 2009

Introduction To ADO.NET With XML

Introduction

ADO.NET can be used as a powerful XML middleware. Although coming from ADO, it has been entirely redesigned for a better support for Web applications. A main feature of ADO.NET is its disconnected recordsets, known as DataSet. It acts as a feature-rich in-memory database or data cache. In other words, it does not maintain any database server cursors. All recordsets database characteristics are available in DataSet, such as sorting, paging, filtered views, relations, indexing, and primary/foreign keys.

Native support for XML is another principal feature for ADO.NET. In native mode, record tables are stored as XML documents where schema and data are treated as distinct and replaceable elements. It is quite different from ADO. The ADO native storage format for a recordset is the Advanced Data Table Gram (ADTG) file format, which is a proprietary, binary schema that represents a recordsets in-memory image. The DataSet objects in ADO.NET can load its data from variant sources: a database server, a local or remote XML file and any accessible system resources. Once the data is loaded, they can be either treated as a record table or a virtual XML document. We principally discuss the latter. Now, I will give you several use cases. Each use case is a standalone unit test which can be run under NUnit. So you should install a latest version of NUnit. More information about its installation and usage can be found here.

Before executing these examples, you should also setup an ODBC connection for the database with the following steps:

  1. Get the file (NWIND_2002.MDB) from the internet.
  2. Open Control Panel -> Administrative Tools -> Data Source.
  3. Choose the System Data Sources tab.
  4. Click "Add" button and choose "Microsoft Access Driver (*.mdb)" from the list. Then an ODBC configuration dialog appears.
  5. Enter "XmlDb_NorthWind" as the Data Source Name (DSN), and choose the Access file "NWIND_2002.MDB" as the data source.
Here are the relationships between the tables in the Access file:

Relation between tables


Figure 1: Relationships between tables

Transform a single table to XML document

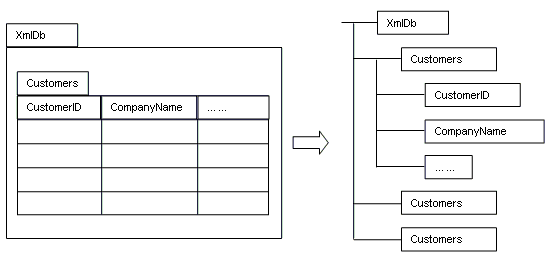
With ADO.NET, we can easily build a virtual XML document on top of recordset tables. Its root element has exactly the same name as the DataSet object. Tables in the DataSet object present as child nodes of the root element. For example, there is a DataSet named "XmlDb". When it is transformed into XML document, the name of its root element will be "XmlDb" (refer to Figure 2). All rows in the table "Customers" will be mapped to a unique child node of the root element, whose node name matches the table name "Customers". In Figure 2, "CustomID", "CompanyName", etc. are fields of the table "Customers". When they are transformed into XML, they present as child nodes of "Customers". Their node name will be the same as the field name and node value will be the value of that field.

database


Figure 2: Transformation of a single table to XML document.

The following simple example explains how ADO.NET maps the DataSet object to a virtual XML document:


using System;
using System.IO;
using System.Xml;
using System.Data;
using System.Data.Odbc;
using NUnit.Framework;
[Test] public void SingleTable2XML()
{
//Create an ODBC connection to the database. Here it is an Access file
OdbcConnection conn = new OdbcConnection("DSN=XmlDb_NorthWind");

//Create a DataSet with a name "XmlDb"
DataSet dataset = new DataSet("XmlDb");

//Create a DataAdapter to load data from original data source to the DataSet
OdbcDataAdapter adapter = new OdbcDataAdapter();
adapter.SelectCommand = new OdbcCommand("SELECT * FROM Customers", conn);
adapter.Fill(dataset, "Customers");

//Create a virtual XML document on top of the DataSet
XmlDataDocument doc = new XmlDataDocument(dataset);

//Output this XML document
doc.Save(Console.Out);

//NUnit test to confirm the result is exactly what we expect
Assert.AreEqual("XmlDb", doc.DocumentElement.LocalName);
Assert.AreEqual("Customers", doc.DocumentElement.FirstChild.LocalName);
}
Output:

ALFKI
Alfreds Futterkiste
Maria Anders
Sales Representative

Obere Str. 57

Berlin
12209
Germany
030-0074321
030-0076545


**********


Transform Master-Detail tables to XML document
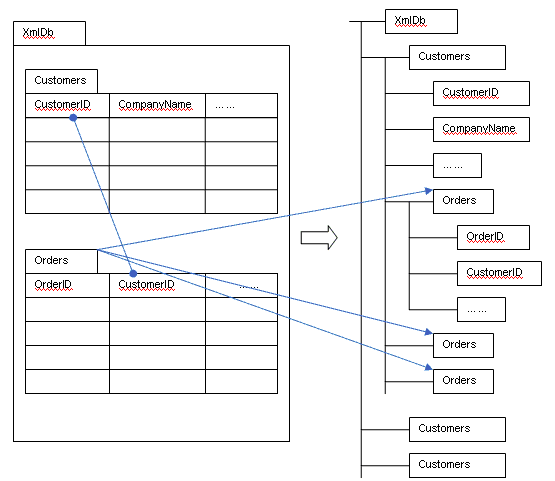
Entity-Relationship model is a long-tested approach to map the real world to database structure. Relationships are often represented as Master-Detail tables, which can be naturally transformed into XML parent/child nodes, with ADO.NET. The Figure 3 shows you such a mapping:


Figure 3: Transformation of Master-Detail tables to XML document.
The key point to generate nested XML nodes is to setup a DataRelation object to link the master table and the detail table with the primary key and the foreign key. Like this:

DataColumn primarykey = dataset.Tables["Customers"].Columns["CustomerID"];
DataColumn foreignkey = dataset.Tables["Orders"].Columns["CustomerID"];
DataRelation relation = dataset.Relations.Add(primarykey, foreignkey);

It is not enough. You must also set the "Nested" property of the DataRelation to "true":

relation.Nested = true;

Full code:


using System;
using System.IO;
using System.Xml;
using System.Data;
using System.Data.Odbc;
using NUnit.Framework;
[Test] public void MasterDetailTables2XML()
{
//Create an ODBC connection to the database. Here it is an Access file
OdbcConnection conn = new OdbcConnection("DSN=XmlDb_NorthWind");

//Create a DataSet with a name "XmlDb"
DataSet dataset = new DataSet("XmlDb");

//Load master table from original data source to the DataSet
OdbcDataAdapter adapter = new OdbcDataAdapter();
adapter.SelectCommand = new OdbcCommand("SELECT * FROM Customers", conn);
adapter.Fill(dataset, "Customers");

//Load detail table from original data source to the DataSet
adapter.SelectCommand = new OdbcCommand("SELECT * FROM Orders", conn);
adapter.Fill(dataset, "Orders");

//Get the primary key column from the master table
DataColumn primarykey = dataset.Tables["Customers"].Columns["CustomerID"];

//Get the foreign key column from the detail table
DataColumn foreignkey = dataset.Tables["Orders"].Columns["CustomerID"];

//Assign a relation
DataRelation relation = dataset.Relations.Add(primarykey, foreignkey);

//Ask ADO.NET to generate nested XML nodes
relation.Nested = true;

//Create a virtual XML document on top of the DataSet
XmlDataDocument doc = new XmlDataDocument(dataset);

//Output this XML document
doc.Save(Console.Out);

//NUnit test to confirm the result is exactly what we expect
Assert.AreEqual("XmlDb", doc.DocumentElement.LocalName);
Assert.AreEqual("Customers", doc.DocumentElement.FirstChild.LocalName);
Assert.AreEqual("Customers",
doc.GetElementsByTagName("Orders")[0].ParentNode.LocalName);
}


Output:


ALFKI
Alfreds Futterkiste
Maria Anders
Sales Representative

Obere Str. 57
Berlin
12209
Germany
030-0074321
030-0076545
10643
ALFKI
1995-09-25T00:00:00.0000000+02:00
1995-10-23T00:00:00.0000000+02:00
1995-10-03T00:00:00.0000000+02:00
29.4600
Alfreds Futterkiste
Obere Str. 57
Berlin
12209
Germany
10692
ALFKI
1995-11-03T00:00:00.0000000+01:00
1995-12-01T00:00:00.0000000+01:00
1995-11-13T00:00:00.0000000+01:00
61.0200
Alfred's Futterkiste
Obere Str. 57
Berlin
12209
Germany


**********

Query a database with XPath

.NET Framework implements all DOM interfaces in its System.Xml namespace. Moreover, it has integrated XPath in the XmlNode level as an extension to DOM. So, once a virtual XML document is built, it can be queried with XPath immediately. For example, in last section, we have created an XML document which represents "Customers" and their correspondent "Orders". Now, we want to find out all customers in Berlin and have asked to ship the ordered products to Germany. We can perform such a search on the XML document with one line of code:

XmlNodeList nodeList =
doc.SelectNodes("/XmlDb/Customers/Orders[../City='Berlin'" +
" and ShipCountry='Germany']");
It will put all qualified nodes into an XmlNodeList which can be visited with a "foreach":
Collapse Copy Code
foreach (XmlNode node in nodeList)
{
......
}
Here is a full example:

using System;
using System.IO;
using System.Xml;
using System.Data;
using System.Data.Odbc;
using NUnit.Framework;
[Test] public void QueryWithXPath()
{
//Create an ODBC connection to the database. Here it is an Access file
OdbcConnection conn = new OdbcConnection("DSN=XmlDb_NorthWind");

//Create a DataSet with a name "XmlDb"
DataSet dataset = new DataSet("XmlDb");

//Load master table from original data source to the DataSet
OdbcDataAdapter adapter = new OdbcDataAdapter();
adapter.SelectCommand = new OdbcCommand("SELECT * FROM Customers", conn);
adapter.Fill(dataset, "Customers");

//Load detail table from original data source to the DataSet
adapter.SelectCommand = new OdbcCommand("SELECT * FROM Orders", conn);
adapter.Fill(dataset, "Orders");

//Get the primary key column from the master table
DataColumn primarykey = dataset.Tables["Customers"].Columns["CustomerID"];

//Get the foreign key column from the detail table
DataColumn foreignkey = dataset.Tables["Orders"].Columns["CustomerID"];

//Assign a relation
DataRelation relation = dataset.Relations.Add(primarykey, foreignkey);

//Ask ADO.NET to generate nested XML nodes
relation.Nested = true;

//Create a virtual XML document on top of the DataSet
XmlDataDocument doc = new XmlDataDocument(dataset);

//Create an output buffer
StringBuilder stringBuilder = new StringBuilder();
stringBuilder.Append("");

//Perform an XPath query
XmlNodeList nodeList =
doc.SelectNodes("/XmlDb/Customers/Orders[../City='Berlin'" +
" and ShipCountry='Germany']");

//Visit results in the list
foreach (XmlNode node in nodeList)
{
stringBuilder.Append(node.OuterXml);

//NUnit tests to confirm the result is exactly what we expect
Assert.AreEqual("ShipCountry", node.ChildNodes[10].LocalName);
Assert.AreEqual("Germany", node.ChildNodes[10].InnerText);
Assert.AreEqual("City", node.ParentNode.ChildNodes[5].LocalName);
Assert.AreEqual("Berlin", node.ParentNode.ChildNodes[5].InnerText);
}
stringBuilder.Append("");
XmlDocument docResult = new XmlDocument();
docResult.LoadXml(stringBuilder.ToString());
docResult.Save(Console.Out);
}

Output:

10643
ALFKI
1995-09-25T00:00:00.0000000+02:00
1995-10-23T00:00:00.0000000+02:00
1995-10-03T00:00:00.0000000+02:00
29.4600
Alfreds Futterkiste
Obere Str. 57
Berlin
12209
Germany
10692
ALFKI
1995-11-03T00:00:00.0000000+01:00
1995-12-01T00:00:00.0000000+01:00
1995-11-13T00:00:00.0000000+01:00
61.0200
Alfred's Futterkiste
Obere Str. 57
Berlin
12209
Germany

**********

The mapping between XmlElement and DataRow
Although accessing DataSet with XML provides some unique advantages, we still need to obtain some complemental information about the data. For example, ADO.NET marks every DataRow with its current state, namely Added, Deleted, Detached, Modified, and Unchanged. These states are important when we perform update to the data source. Fortunately, XmlDataDocument provides a useful method to help us get correspondent DataRow from the XmlElement. Once we get the DataRow, its current state can be obtained through its property RowState:

DataRow row = xmlDataDocument.GetRowFromElement(xmlElement);
Console.Write("RowState: ");
switch(row.RowState)
{
case DataRowState.Added:
Console.WriteLine("Added");break;
case DataRowState.Deleted:
Console.WriteLine("Deleted");break;
case DataRowState.Detached:
Console.WriteLine("Detached");break;
case DataRowState.Modified:
Console.WriteLine("Modified");break;
default:
Console.WriteLine("Unchanged");break;
}
We can also detect whether there are errors after performing update:
Collapse Copy Code
DataRow row = xmlDataDocument.GetRowFromElement(xmlElement);
if (row.HasErrors)
Console.WriteLine(row.RowError);
else
Console.WriteLine("Everything is OK.");

XmlDataDocument provides another method GetElementFromRow to map a DataRow to XmlElement. Here is a complete example:

using System;
using System.IO;
using System.Xml;
using System.Data;
using System.Data.Odbc;
using NUnit.Framework;
[Test] public void MappingBetweenXmlElementAndDataRow()
{
//Create an ODBC connection to the database. Here it is an Access file
OdbcConnection conn = new OdbcConnection("DSN=XmlDb_NorthWind");

//Create a DataSet with a name "XmlDb"
DataSet dataset = new DataSet("XmlDb");

//Create a DataAdapter to load data from
//original data source to the DataSet
OdbcDataAdapter adapter = new OdbcDataAdapter();
adapter.SelectCommand = new OdbcCommand("SELECT * FROM Products", conn);
adapter.Fill(dataset, "Products");

//Create a virtual XML document on top of the DataSet
XmlDataDocument doc = new XmlDataDocument(dataset);

Console.WriteLine("=========== GetRowFromElement ================");

//Perform XPath query
XmlNodeList nodeList = doc.SelectNodes("/XmlDb/Products[CategoryID=3]");
foreach (XmlNode node in nodeList)
{
//Map XmlElement to DataRow
DataRow row = doc.GetRowFromElement((XmlElement) node);
Console.WriteLine("Product Name = " + row["ProductName"]);
Assert.AreEqual(3, row["CategoryID"]);
}

Console.WriteLine("=========== GetElementFromRow ================");

//Perform ADO.NET native query
DataRow[] rows = dataset.Tables["Products"].Select("CategoryID=3");
foreach (DataRow row in rows)
{
//Map DataRow to XmlElement
XmlElement elem = doc.GetElementFromRow(row);
Console.WriteLine("Product Name = " + elem.ChildNodes[1].InnerText);
Assert.AreEqual("3", elem.ChildNodes[2].InnerText);
}
}

Output:

=========== GetRowFromElement ================
Product Name = Pavlova
Product Name = Teatime Chocolate Biscuits
Product Name = Sir Rodney's Marmalade
Product Name = Sir Rodney's Scones
Product Name = NuNuCa Nuß-Nougat-Creme
Product Name = Gumbär Gummibärchen
Product Name = Schoggi Schokolade
Product Name = Zaanse koeken
Product Name = Chocolade
Product Name = Maxilaku
Product Name = Valkoinen suklaa
Product Name = Tarte au sucre
Product Name = Scottish Longbreads
=========== GetElementFromRow ================
Product Name = Pavlova
Product Name = Teatime Chocolate Biscuits
Product Name = Sir Rodney's Marmalade
Product Name = Sir Rodney's Scones
Product Name = NuNuCa Nuß-Nougat-Creme
Product Name = Gumbär Gummibärchen
Product Name = Schoggi Schokolade
Product Name = Zaanse koeken
Product Name = Chocolade
Product Name = Maxilaku
Product Name = Valkoinen suklaa
Product Name = Tarte au sucre
Product Name = Scottish Longbreads

Directly generate HTML from DataSet with XSLT


It is quite attractive to convert the content in DataSet to variant output formats, such as HTML/XHTML, WAP, PDF, SVG etc. The .NET Framework provides perfect support for XSLT which facilitates such kinds of transformation. More information about XSLT can be found here.

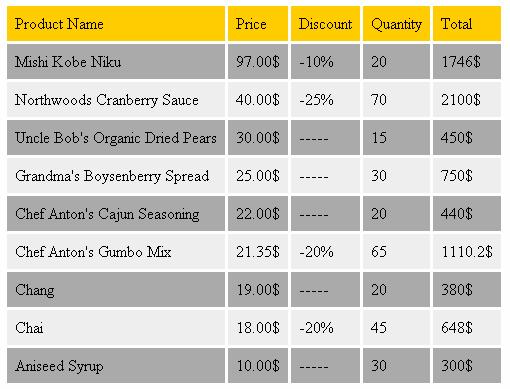
Now, lets suppose we want to generate a simple report about the order details of the ten most expensive products. Following the previous several sections, we can easily build a virtual nested XML document from the "Products" and "OrderDetails" tables. Then we create an XSTL file like this:

Product Name
Price
Discount
Quantity
Total

#EEEEEE
#AAAAAA
10$
10
10%
10
10
10
10$
10


Now, write a simple function to perform the XSLT transformation:

[Test]


public void GenerateHTMLFromXSLT()
{

//Create an ODBC connection to the database. Here it is an Access file
OdbcConnection conn = new OdbcConnection("DSN=XmlDb_NorthWind");

//Create a DataSet with a name "XmlDb"

DataSet dataset = new DataSet("XmlDb");
//Load "Products" table from original data source to the DataSet

OdbcDataAdapter adapter = new OdbcDataAdapter();
adapter.SelectCommand = new OdbcCommand("SELECT * FROM Products", conn);

adapter.Fill(dataset, "Products");

//Load "Order Details" table from original data source to the DataSet
adapter.SelectCommand = new OdbcCommand("SELECT * FROM [Order Details]", conn);

adapter.Fill(dataset, "OrderDetails");

//Create a relationship between the two tables

dataset.Relations.Add(dataset.Tables["Products"].Columns["ProductID"],

dataset.Tables["OrderDetails"].Columns["ProductID"]).Nested = true;

//Build a virtual XML document on top of the DataSet

XmlDataDocument doc = new XmlDataDocument(dataset);

//Load the XSLT file. NOTE: Here it is compiled as an embedded resource file

Assembly assembly = System.Reflection.Assembly.GetExecutingAssembly();

XslTransform xslTran = new XslTransform();

Stream xslStream = assembly.GetManifestResourceStream("UnitTest_ADO.NET_XML.Test.xslt");
XmlTextReader reader = new XmlTextReader(xslStream);

xslTran.Load(reader, null, null);
//Output the result a HTML file

XmlTextWriter writer = new XmlTextWriter("xsltresult.html",System.Text.Encoding.UTF8);

xslTran.Transform(doc.CreateNavigator(), null, writer, null);

writer.Close();

}


Output:
Ado Dot Net And XML


Figure 4: HTML Output


Extension: Advanced XPath Query


Standard XPath is not powerful enough to be a database query language, e.g.: it lacks the DateTime related functions. Fortunately, it could be enhanced with customized XPath functions. Mr. Prajakta Joshi has published a very comprehensive article on this topic in MSDN. But his approach is too complex to follow. You should manually point out the function name, arguments number and their types, return type for every customized function, etc. It is not so flexible to add new XPath functions and is hard to maintain. Now, let's use the Reflection mechanism in .NET Framework to simplify this process (refer to Figure 5).


Figure 5: Customize XPath functions


All customized functions can only present as static methods in the XmlDbXPathFunctions class. Once XPathExpress requires XsltContext to ResolveFunction(). The XsltContext creates an XmlDbXPathFunctionWrapper object which implements the IXsltContextFunction interface. A function name and required argument types will be passed to its constructor. In the constructor, XmlDbXPathFunctionWrapper tries to find a best-fit static method in the XmlDbXPathFunctions class. Then XPathExpression call the Invoke() method of XmlDbXPathFunctionWrapper, which will invoke the real correspondent method in the XmlDbXPathFunctions class and return the result.


This is a very flexible approach to extend the XPath. If you want to add your own function to XPath execution context, you just need to write a static method in the XmlDbXPathFunctions class. The new function will be detected automatically.


Some useful DateTime functions have already been added. Now you can extract the year, month, day, hour, minute, second, ticks form a DateTime XmlNode. It is quite helpful when you try to filter the XmlNode set with the DateTime information.
For example:
"//Orders[ex:year(string(ShippedDate)) = 1995 and ex:month(string(ShippedDate)) <= 3]" will seek all orders shipped in the first quarter in the year of 1995.

[Test]
public void XPathExtension()
{
//Create an ODBC connection to the database. Here it is an Access file OdbcConnection conn = new OdbcConnection("DSN=XmlDb_NorthWind");
//Create a DataSet with a name "XmlDb" DataSet dataset = new DataSet("XmlDb");
//Create a DataAdapter to load data from original data source to the DataSet
OdbcDataAdapter adapter = new OdbcDataAdapter(); adapter.SelectCommand = new OdbcCommand("SELECT * FROM Orders", conn);
adapter.Fill(dataset, "Orders");
//Create a virtual XML document on top of the DataSet XmlDataDocument doc = new XmlDataDocument(dataset);
//Create an XPath navigator
XPathNavigator nav = doc.CreateNavigator();
//XPath expression
String xpath = "//Orders[ex:year(ShippedDate)=1995 and ex:month(ShippedDate)<=3]"; //Compile the XPath expression
XPathExpression xpathexp = nav.Compile(xpath);
//Assign a customized XPath context
XmlDbXPathContext context = new XmlDbXPathContext(new NameTable()); context.AddNamespace("ex", "http://openvue.net"); xpathexp.SetContext(context);

//Perform XPath query
XPathNodeIterator it = nav.Select(xpathexp);
//Output the result
StringBuilder stringBuilder = new StringBuilder(); stringBuilder.Append("");
while (it.MoveNext())
{

XmlElement elem = (XmlElement)((IHasXmlNode)it.Current).GetNode();

stringBuilder.Append(elem.ChildNodes[4].OuterXml);

DateTime dt = Convert.ToDateTime(elem.ChildNodes[4].InnerText);

Assert.AreEqual(1995, dt.Year);

Assert.IsTrue(dt.Month <= 3);
}
stringBuilder.Append("
");

XmlDocument docResult = new XmlDocument();
docResult.LoadXml(stringBuilder.ToString());
docResult.Save(Console.Out);

}


Output:

1995-01-03T00:00:00.0000000+01:00


1995-01-02T00:00:00.0000000+01:00

1995-02-16T00:00:00.0000000+01:00

1995-01-13T00:00:00.0000000+01:00

1995-01-16T00:00:00.0000000+01:00

1995-02-10T00:00:00.0000000+01:00

1995-02-10T00:00:00.0000000+01:00

1995-02-09T00:00:00.0000000+01:00

1995-03-02T00:00:00.0000000+01:00

1995-02-27T00:00:00.0000000+01:00

1995-02-27T00:00:00.0000000+01:00

1995-03-03T00:00:00.0000000+01:00
1995-03-27T00:00:00.0000000+02:00
1995-02-27T00:00:00.0000000+01:00
1995-03-17T00:00:00.0000000+01:00
1995-03-09T00:00:00.0000000+01:00


1995-03-31T00:00:00.0000000+02:00


********


If you need some special XPath functions, just add them as static methods into the XmlDbXPathExtensionFunctions class. These static methods will be found automatically and be applied to your XPath query. Really simple, isn't it?


Conclusion

Treating a database as a large virtual XML document with ADO.NET is not always a good idea. It demands more memory, and its performance could be a big problem in the case of complex and enormous databases. But for relatively small projects, it works perfectly and might save a lot of time for you. Anyways, you could optimize the code above to make it meet your requirements.

Followers